| One of my dreams growing
up in the 70's and 80's was to have my own arcade games at my house.
I had a few console systems, but that's about as far as the Arcade experience
got for me. Whenever I had a controller for a console system, I would
imagine how I would transform it into a real Arcade Style Joystick.
When I bought a Super Nintendo Entertainment System years ago I bought
a joystick at the Thousand Oaks Mall in Thousand Oaks, CA from a shop called
Babbages. It was rather large, and had almost perfect Real Arcade
controls. I loved playing games like Super Smash TV and Street Fighter
II games, as well as Mortal Kombat games. Using the joystick was
fun like the Arcade for a while, but in time I grew tired of the joystick
and sold it at a swap meet for like $30. I now feel quite stupid
for doing that now that people are collecting the Super Nintendo.
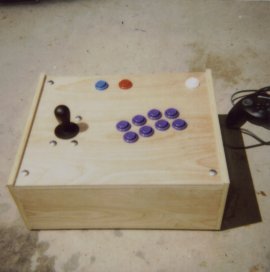
Well it's 1999 and now I can finally say that I have my dream come true in the form of some really nice Arcade Game Emulators and a Real Arcade Joystick I made with the help of a few web pages on the net and my friend Dutch who has many wood-working power tools.
I made the unit with the following parts:
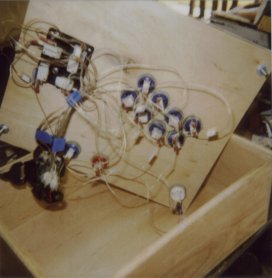
Where to start? Buy a Sidewinder. Order the Happ controls. Make sure you have the soldering iron (thin tip) and some rosin core solder. Grab some standard wire (I used speaker wire I already had - works fine) not too thick, but wound wire (not single thread) and cut pieces big enough for the wires to stretch like 12-14 inches for the buttons which are to be far from the game pad's pc board, and smaller ones to daisy chain the ground. Label the wires the same as what you see on the contacts on the sidewinder. Once you understand the points on the sidewinder you'll get a bit excited. It's freaking SIMPLE. I attached the ground to the back where the original solder is - right next to one of the BR/BL red wires (either ground is fine). I only tinned the iron and heated the old solder and dropped a wire down in it. Boom. Make a list of the stuff you need from this page, and make sure you have it all before you start. Label all the wires on both ends so you can go into NO BRAIN mode (helps sometimes) and I tinned one of the ends (the ones that go into the points on the sidewinder just to make it a tad easier (experienced solder people omit this part if you like). There are a couple of web sites I visited to get a better picture of the project. This one has some really good pictures of the solder points on the Sidewinder (top left) (top right) (bottom). You'll see them empty when you open the Sidewinder up for gutting. Here's a site that has some more projects, and a great picture of just which point to ground to on the Arcade Buttons.
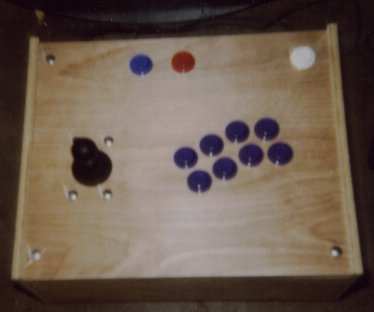
The Prototype It's very necessary to make a "Prototype" of the project to make sure the soldering you did works, and also to get the basic layout of the buttons and joystick. Grab a cardboard box and use the gray washers
that attach the pushbuttons - to pencil in circles to cut on the
cardboard. Use the same washer to pencil in the center of the joystick
since it needs to move a little. Grab and exacto knife and cut the
holes and screw all the stuff in. Oh yeah - the prototype job (cardboard)
is essential to happiness. If you run into any problems you need
to stay on this phase. I would include a picture of the prototype
box, but it doesn't deserve photo paper. Ugly indeed. haha
Very Special Thanks to:
PD '99 |